
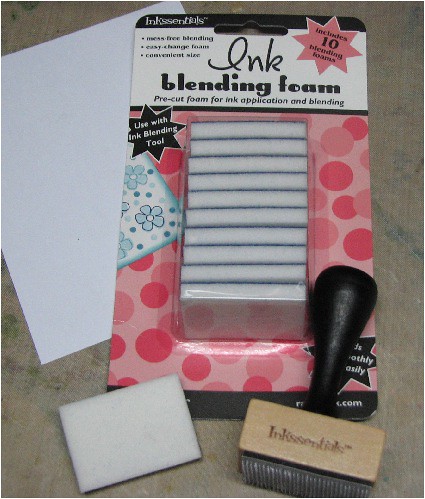
The Ink Blending Tool and Foam by Ranger has to be my favorite tools of all time!
This highly versatile and easy to use tool will enable you to produce many, MANY different looks and techniques. It works not only with inks but with paints, chalks, Perfect Pearls, etc. the list goes on and on. It is well worth the small cost to get started. I promise you it will be one of the few tools you reach for over and over again.
I've had lots of questions about the tool and the foam so before I show you how to use it a bit about the foam it's self.
Someone asked, "Can I re-use the foam or is it a one time use type of thing like the Alcohol Ink Applicator Felts?". Yes, the foam pieces are re-usable. They are also washable so if you decide that you no longer wish to use that color of ink simply toss it in the washing machine or hand wash and it's set to go.
Another question asked was, "Are the foam pads durable and how often do they have to be replaced?". Yes, the pads are VERY
durable. As for the second part of that question I have to be honest and say I can't answer that question. I received my original set of foam pads March 31st of 07 and they are still going strong! I have used them for MANY techniques, inked loads of projects and the foam is no worse for the wear.
durable. As for the second part of that question I have to be honest and say I can't answer that question. I received my original set of foam pads March 31st of 07 and they are still going strong! I have used them for MANY techniques, inked loads of projects and the foam is no worse for the wear.
"Do I have to have one foam for each color?" No, not unless you want to. I keep a set for each type of ink I use for example, I have a set used for Distress Inks, one for Nick Bantock inks, a set for Adirondack Originals, etc. A "set" consists of 8 pads, one foam pad for shades of Red, Yellow, Orange, Blue, Green, Purple, Browns, and Black. When I am working on a project that I will be using multiple shades of one color I always start by applying the lightest shade first and work my way to the darkest shade.
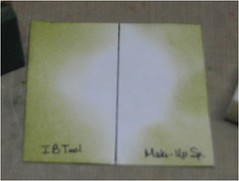
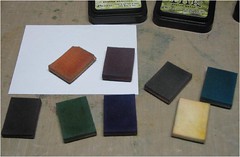
A frequently asked question is "Is the foam the same as make-up sponges?" NO! They are not the same at all. While you can use a make-up sponge to apply inks they are a totally different animal. Make-up sponges absorb the ink so it will take much more ink for any project you are working on. It also doesn't offer the same control as you get with the Blending Tool Foams as the cellular structure is vastly different.
I did a little side by side comparison of the two. You will notice how the make-up sponge is a bit blotchy in spots. The Ink Blending Foam is a much smoother even finish. You have much more control over light and dark applications and it takes far less ink to do the same job.
Putting the Blending Tool To Work!!
O.k., lets begin :) This will give you the basics on how to use the Ink Blending Tool.
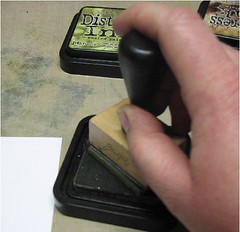
First, place a Foam Pad onto the handle. It is Velcro so it will just stick right on. Don't worry about it coming off. I have never had a pad come off in the whole time I've used it.
Once you have the foam pad attached to the handle, pounce your blending tool on the ink of your choice. (Note: If working with multiple inks, start with the lightest shade first.) For this example I am using Distress Inks.
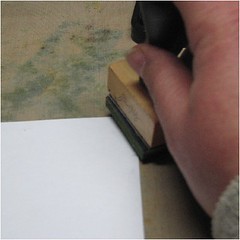
Starting off the edge of your paper work the ink onto the paper using a swirling or circle motion. Continue to swirl until you feel you need additional ink. Pounce to pick up ink and again start off the edge swirling inwards. (NOTE: For this technique you should avoid starting in the middle of a project with a fully inked foam piece. This will give you a big old inky rectangle where you don't want it.) 
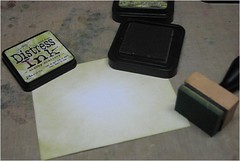
Apply as much or as little ink as desired. For this look I leave the center of the paper un-inked as shown in the photo.

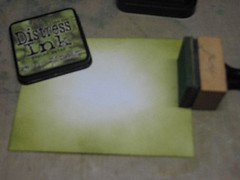
You may stop here or if you wish, or you may continue to apply additional inks in the same manner as the first to build up layers of color. In the example, I applied Peeled Paint over Shabby Shutters which was applied in the first coat.
You may stop here or if you wish, or you may continue to apply additional inks in the same manner as the first to build up layers of color. In the example, I applied Peeled Paint over Shabby Shutters which was applied in the first coat.
NOTE: Do not cover the entire first coat of ink with the subsequent layers of ink. I usually apply the 2nd coat half way over of the first coat, the 3rd coat half way over the second, etc. This is what gives the gradual lightening appearance on the finished project.
The paper is ready to use at any point. You may wish to stop and create your project with this or you may want to go on to this next step. It is not necessary but I love the vintage worn look so I really enjoy adding this next step and do so quite often.
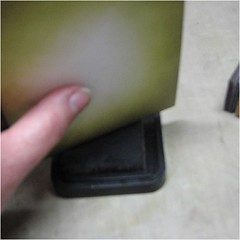
Working in small sections, run one edge of your paper over a darker shade of ink.  In the example I am using Walnut Stain Distress Ink.
Place the paper down on your work surface and with the Ink Blending Tool swipe the Walnut Distress Ink from the outside edge to the center of your paper.
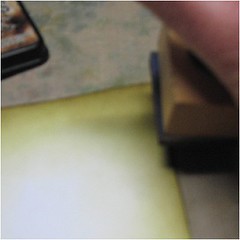 In the example I am using Walnut Stain Distress Ink.
Place the paper down on your work surface and with the Ink Blending Tool swipe the Walnut Distress Ink from the outside edge to the center of your paper.
Continue working in sections until  the entire outside edge has been inked. By doing this you will create a nice "warm" finished edge to your project.
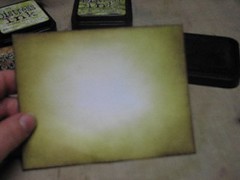 the entire outside edge has been inked. By doing this you will create a nice "warm" finished edge to your project.
 We will stop here as this piece is now ready to be used on my card. You can see in the finished example I have stamped over this background with several images and added another smaller piece that was made in the same fashion using blue inks (Weathered Wood, Broken China & Faded Jeans) in place of the green.
 There is another technique called the Burnt Edge Technique that takes the basics of this technique one step further by heavily distressing the edges giving it an even more vintage feel. We will go over this and many other techniques using the Ink Blending Tool in the coming weeks. In the mean time, I hope this has helped clear up some of the mystery around the Ink Blending Tool and entices you to give it a try :)
There is another technique called the Burnt Edge Technique that takes the basics of this technique one step further by heavily distressing the edges giving it an even more vintage feel. We will go over this and many other techniques using the Ink Blending Tool in the coming weeks. In the mean time, I hope this has helped clear up some of the mystery around the Ink Blending Tool and entices you to give it a try :)Wishing you have a wonderful Ink Stained day!!
Great tutorial! I just got this tool and this will come in handy. Thanks!
ReplyDeleteI gotta get one of these...now that I know what to do with it. It always looked so cool but was always afraid to try it out without any instruction on how to use it.
ReplyDeleteBlessings,
Holly T. (hollybirdy off of About.com board)
yippeee!!! I LOVE to learn more about what to do with my alcohol inks! I've been using felt? suppose I should invest in some foams :)
ReplyDeletehmmm... so after you have created your background, then how do you pick out what stamps to use? I find it SO traumatizing to use multiple stamps together that aren't "sets" kwim?
I just love the way you have that knack, and for the 'perfect' colours etc... so spill it chick!
TEACHA, pwease help young grwasshoppa
see how well *I* pay attention ~blush~ I totally thought you were using alcohol inks! {DUH} so anyway... carry on...
ReplyDeleteI just told T this was my first thing to buy when I got done with this freeze! :-) Thanks for the tutorial!
ReplyDeleteAnn
Oh! I WANT this tool! And you answered every single question that came to mind....how cool is that?! I've been using a sponge to try and get that blended ink look on paper, and it just doesn't do the trick! Now I know why....I need the Ink Blending tool!!!
ReplyDeleteKaren
I hadn't even heard of this tool before but it looks really cool. I'll have to add it to my wish list. Great tutorial!
ReplyDeleteAwesome job, Roni!!!!
ReplyDeleteInky Hugs, Robin
OMG - I always wondered what that little blending sponge was used for! Now I know and I must get some!!!
ReplyDeleteI just found your tut! Thanks!
ReplyDelete